

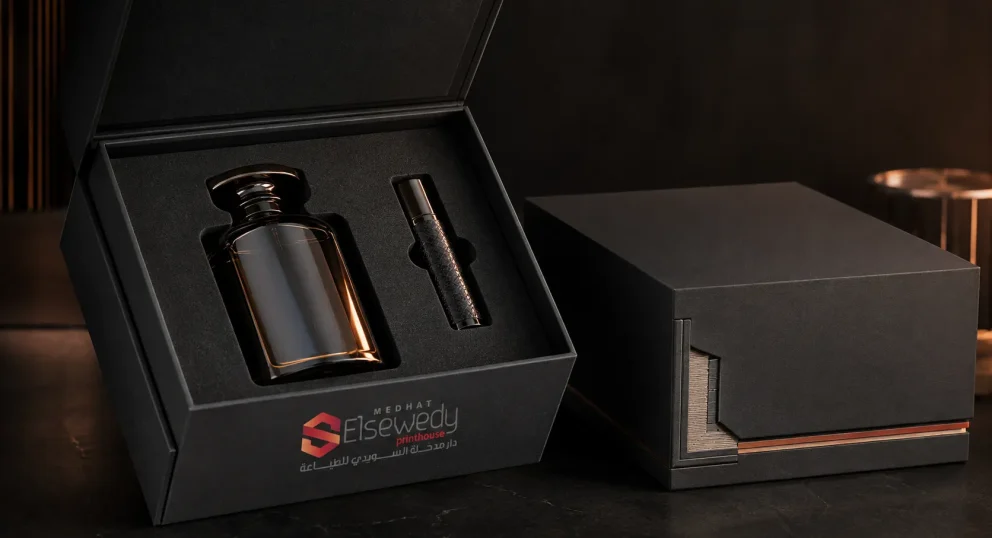

Your product might already be luxurious, but a flimsy box, a loose lid, or an insert that fails to hold the product in place can lower its value in the very first moment. This is the rigid box. It is not just a box, but the first sensory conversation between you and your customer.
For this reason, rigid box printing for luxury products should not start with choosing a box color or a logo shape. It should start with understanding the product, its weight, how it will be displayed, and the opening experience you want the customer to remember.
The choice does not rest on price or appearance alone. The box type, the thickness of the rigid board, the outer covering material, the internal insert, and the printing and finishing methods are all decisions that affect the box’s durability, product protection, visual identity consistency, and final cost. Getting any of these wrong can raise the cost without adding real value to the product.
At Dar Medhat ElSewedy Printing, since 1998, we have produced millions of rigid box units for brands in Egypt, Saudi Arabia, the UAE, Kuwait and Oman, covering perfumes, jewelry, cosmetics, corporate gifts, and premium electronics. We ship weekly to Riyadh, Jeddah, Dammam, Dubai, Abu Dhabi and Kuwait.
In this guide, you will learn about the types of rigid boxes, the available materials and inserts, the most important finishing options, the factors that determine cost, and how to choose the specifications that give your product the protection and appearance it deserves without unnecessary spending.
What Is a Rigid Box? And Why Is It the Top Packaging Choice for Luxury Brands?
A rigid box, also called hard cover packaging, is solid packaging made from thick rigid board, either greyboard or chipboard, 1 to 3 millimeters thick, covered in premium printed paper, fabric, or synthetic leather. It does not fold, does not compress, and does not collapse. Its size is fixed and its shape is defined.
The Core Difference from a Regular Folding Carton
| Criteria | Rigid Box | Regular Folding Carton |
| Structure | Solid board, 1 to 3 mm | Thin foldable cardboard |
| Feel in hand | Heavy and solid | Light |
| Shape | Fixed, does not change | Folds and stores flat |
| Opening experience | Premium and interactive | Ordinary |
| Available finishing | All premium finishes | Limited |
| Production | Partly manual plus automated | Fully automated |
| Cost | Higher | Lower |
| Perceived value | Exceptional | Ordinary |
Why Does a Rigid Box Raise Your Product’s Value Directly?
Weight signals quality. Psychology confirms that perceived heaviness raises perceived value. A heavy rigid box in your customer’s hand tells them this product is exceptional before they even see it.
The unboxing experience. Billions of views on YouTube and Instagram go to unboxing videos. A rigid box creates a moment that gets filmed and shared, continuous free marketing.
Keeping the box. Your customer keeps a beautiful rigid box and reuses it later, so your brand stays in their home for months after the purchase.
ElSewedy Insight: Do not look at a rigid box as a cost. Look at it as an investment in your first physical point of contact with your customer. A customer who keeps your box becomes a free ambassador for your brand.
When Is Rigid Box Printing Right for Your Product?
Rigid box printing makes sense when the box does more than protect, and becomes part of the product’s value and the buying experience. It is a strong choice for brands that need durable packaging, a premium look, and more room for customization and finishing.
Rigid boxes are especially suited to the following:
- Premium perfumes and cosmetics
- Jewelry, watches and accessories
- Chocolate, dates and luxury gifts
- Electronics and other high value products
- Corporate gifts and welcome sets
- Limited editions and seasonal collections
But it is not the economical choice for every product. If the product is low priced, produced in very limited quantities, or needs light packaging that stores and ships flat, folding cartons may be more suitable.
ElSewedy Insight: Do not choose a rigid box just because it looks more premium. Choose it when it adds value to product protection, the opening experience, and your brand’s standing that justifies its cost.
Types of Rigid Boxes: Which One Suits Your Product and Audience?
Rigid box types differ based on the opening method, the box structure, and how the product is displayed inside it. There is no single design that fits everyone.
The right choice depends on the product’s size and weight, the required opening experience, the internal insert, the budget, and how it will be stored and shipped.
1. Lid and Base Box
The most common classic shape. Two separate pieces, a bottom base and a top lid that covers it fully or partially.
Lid options:
- Full lid: the lid covers the base entirely and opens in a classic way.
- Half lid, or shoulder box: the lid covers only half the base, always leaving part of the base visible, giving a distinctive visual depth.
Opening experience: simple and direct, the lid is lifted to reveal the product.
Best suited for: premium chocolate boxes, perfumes, corporate gifts, watches, and cosmetics.
2. Drawer Sliding Box, or Matchbox Style
Made up of an outer sleeve and an inner drawer that slides out to reveal the product. It needs precise sizing so the drawer moves smoothly without being loose or hard to open.
Opening experience: gradual and theatrical, the product is revealed slowly as the drawer is pulled, which is exactly what gets filmed in unboxing videos.
Best suited for: jewelry, luxury watches, small high value gifts, premium electronics, and distinctive corporate gifts.
3. Magnetic Closure Box
A box that opens sideways like a book, using a hinge, and closes with a magnet hidden in the front edge. The satisfying sound on closing is part of the luxury experience.
Opening experience: the most luxurious and exciting, opening like a book with a satisfying magnetic click.
Best suited for: VIP gifts, above-premium gifts, very high end electronics, luxury perfumes, and small gifts.
The cost difference: a magnetic closure box costs 30 to 50 percent more than a lid and base box with the same specifications, but the experience fully justifies the difference for premium products.
4. Clamshell Box
The lid connects to the base through a hinge, so the box remains one piece that lies flat and elegant when opened. It helps display the product in an organized way and reduces the chance of losing a separate lid.
Best suited for: luxury abayas and clothing, large jewelry pieces, valuable books and printed items, and any product displayed flat and horizontal.
5. Sleeve Box
An inner box, either rigid or folding, wrapped in an outer sleeve that slides off to be removed. The outer sleeve can carry a completely different design from the inner box.
Best suited for: limited editions, seasonal products, and any product that wants to add a layer of mystery and intrigue.
6. Hard Cover Notebook
A product and a marketing tool at the same time. A notebook or planner with a durable hard cover customized with the company’s logo and colors. It stays with the customer all year, putting your brand in every meeting and every note.
Why is it the smartest corporate gift in 2026? It gets used daily for months. It keeps your brand’s name in front of the recipient constantly. Its cost is reasonable compared to its lasting marketing effect. It is fully customizable, logo, colors, and an internal letterhead page.
Best suited for: corporate gifts at exhibitions and conferences, year-end gifts for partners, and welcome gifts for new employees.
The Materials That Make Up a Rigid Box
A rigid box is not made from a single material. It is made from layers that work together to form the solid structure, the outer appearance, and the internal protection.
For this reason, each layer should be chosen based on the product’s weight, the box size, how it will be used, and the required visual result.
1. Greyboard or Chipboard: The Core Structure
This is the internal structure that gives the box its rigidity and fixed shape, before being covered with an outer material that hides its color and edges. Its thickness is determined based on the box size, product weight, and opening design. A thicker board does not always mean a better result, it can add unnecessary weight and cost.
Available thicknesses and their applications:
| Thickness | Best Use |
| 1 mm | Light boxes, notebooks |
| 1.5 mm | Most common, for gifts and medium products |
| 2 mm | Jewelry, watches, electronics |
| 2.5 to 3 mm | Heavy products, maximum luxury |
ElSewedy Insight: The thicker the board, the heavier it feels, and heaviness raises perceived value. But remember it also raises the cost. Choose the thickness your product needs, not always the highest one.
2. Outer Covering Paper
The visible layer that wraps the greyboard and carries the printed design.
Coated art paper is the most common choice, used to cover the structure when the design needs clear images or colors and fine detail.
It can be combined with matte or gloss cellophane, foil, spot UV and other finishes, and is available in weights from 128 to 200 gsm. Suitable for perfumes, cosmetics, chocolate, and products relying on a color rich design.
Special paper offers unique textures and natural colors, giving an authentic and distinctive character. Its response to printing, foil and embossing varies with its surface, so it should be tested before production is approved.
Suitable for: jewelry, luxury gifts, and brands with a calm, minimal identity.
Kraft paper gives the box a natural, warm look, and is used by brands that prefer a simple or artisanal identity. But the base paper color affects how the inks appear, so this should be considered when preparing the design and choosing colors.
3. Fabric and Synthetic Leather
A rigid box can be covered in fabric or synthetic leather instead of paper for a different texture and a more distinctive presence. This type needs special care with the corners, the gluing, and how the logo is placed.
Suitable for: commemorative books, corporate gifts, jewelry, and VIP client sets.
4. Internal Insert Materials
The inside is just as important as the outside.
The insert is not only a decorative element. It holds the product in place, protects it, and organizes how it appears when the box is opened. It can be made from rigid board, foam, or other materials suited to the product’s nature.
- Die-cut foam: laser cut exactly to the product’s shape, holding it in place and preventing movement. Used for jewelry, watches and perfume bottles.
- Satin or padded fabric: a luxurious, warm look, used for jewelry and watch boxes.
- Divided cardboard insert: internal dividers for multiple products inside the same box, ideal for chocolate and gift sets.
| Box Component | Its Main Function | What to Consider |
| Rigid board | Building the structure and rigidity | Size, weight, and opening method |
| Coated paper | Displaying the design and colors | Print and finishing quality |
| Special paper | Adding a distinctive texture and character | Compatibility with foil and embossing |
| Kraft | Giving a natural look | The effect of paper color on inks |
| Fabric or synthetic leather | Achieving a different presence and texture | Covering quality and corner finishing |
| Internal insert | Holding and protecting the product | Sizing and ease of removing the product |
ElSewedy Insight: Do not start choosing the material from the thickness number or paper weight alone. Start from the product’s weight, the box size, and how it will be used, then determine the material that achieves the required rigidity without extra cost.
If the box is intended for food or cosmetics, you should first determine whether the product will directly touch the packaging, then choose materials based on the use case and the relevant regulatory requirements. A premium look alone does not make a material suitable for direct contact.
What Is the Best Method for Rigid Box Printing: Offset or Digital?
The choice between offset and digital printing depends on quantity, the required color precision, the delivery timeline, and the possibility of repeat production, not on one method being absolutely better than the other.
When Is Digital Printing Suitable?
Digital printing is a practical choice for limited quantities, samples, trial editions, and projects that need names or data changed from one box to another. It also lowers initial setup costs and gives the brand more flexibility before moving to wider production.
Digital suits the following:
- Samples and prototypes
- Testing a new design in the market
- Limited and medium quantities
- Seasonal or limited edition releases
- Designs with variable data
- Projects that need more flexible execution
When Is Offset Printing Suitable?
Offset printing is usually more efficient when producing large or repeat commercial quantities. It suits projects that need precise brand identity consistency, special colors, or a lower unit cost as production volume grows.
Offset suits the following:
- Large commercial quantities
- Repeat production plans
- Brands that need specification consistency between batches
- Designs relying on special colors or precise color requirements
- Projects where unit cost is a key factor
At Dar Medhat ElSewedy Printing, we do not impose a single technique on every project. Our HP Indigo 12K digital press and Heidelberg Speedmaster CX 104-5+L offset press give us the flexibility to choose the production method based on quantity, budget, color requirements, and the product’s growth plan.
If the sample will be printed digitally while the final quantity will be produced by offset, the color, material and finishing reference should be agreed on in advance, since the difference in printing technique can create limited variations between the sample and the commercial batch.
What Are the Best Rigid Box Finishes for Luxury Products?
The best rigid box finish is not the most expensive or the shiniest, it is the finish that highlights the brand identity and matches the material and how the box will be used.
In many cases, one or two finishes executed precisely create a stronger effect than combining several effects in a crowded design.
1. Soft Touch Lamination: The Velvety Texture
The most requested finish in the Gulf market currently. It gives the box surface a smooth texture close to velvet, adding a clear sensory experience when holding the box.
It suits perfumes, cosmetics and luxury gifts, but its resistance to fingerprints and scratches should be tested, especially with dark colors.
Why does it dominate the Gulf market? Because consumers in Saudi Arabia and the UAE respond strongly to texture, and soft touch meets that expectation.
Best suited for: perfumes, cosmetics, corporate gifts, and any box targeting the premium segment.
2. Hot Stamping: The Metallic Foil
A real metallic foil, gold, silver, copper, or colored, applied with heat and pressure. No golden ink can imitate a real metallic shine.
Foil succeeds when used in carefully chosen areas, while making sure line thickness and detail can be executed on the chosen material.
The visual difference: golden ink is flat and limited, while hot stamping gives depth, shine, and a light reflection that shifts as the box moves.
The most requested combination in Saudi Arabia: soft touch as the background plus gold hot stamping on the logo, the most luxurious combination our clients in Riyadh and Jeddah request.
3. Spot UV: The Localized Gloss
A glossy varnish layer applied to specific areas, the logo, product name, or any design element. It creates an exceptional visual and sensory contrast between the matte surface and the glossy part.
Its effect shows better when the areas are clear and well defined, while it can lose value if used on too many elements or very fine details.
The effect: your eyes go straight to the spot UV area, and that is exactly what you want for your logo.
Best combined with matte lamination as the background plus spot UV on the logo, a smart simplicity that makes a real difference.
4. Embossing and Debossing
Embossing raises the logo or text upward, giving a three dimensional bump the hand can feel.
Debossing carves the element inward, giving a calm and grounded elegance.
Both add a third dimension that an image alone cannot deliver, a tactile experience that completes the visual one.
ElSewedy Insight: One well executed finish is stronger than four crowded ones. Black soft touch plus gold hot stamping on a simple logo is the peak of luxury. Four finishes on a crowded design is visual chaos.
5. Aqueous Coating
A transparent, food safe protective layer, used for rigid boxes intended for products that touch food. It protects the printing without excessive gloss.
| Visual Goal | Suggested Finish | Important Note |
| Calm luxury | Matte cellophane with limited foil | Suits simple logos |
| Visual and tactile contrast | Matte with spot UV | Use the gloss on one main element |
| A smooth, distinctive texture | Soft touch | Test for fingerprints and scratches |
| A clear metallic presence | Hot foil | Consider line precision and area size |
| A three dimensional logo | Embossing or debossing | Should be tested on the actual material |
| A natural or artisanal identity | Special paper with limited finishing | Let the paper texture lead the design |
At Dar Medhat ElSewedy, we review the compatibility of the design, material and finish before production, because a foil, embossing, or spot UV effect that works well on smooth paper may give a different result on textured paper or a dark surface.
This is why a physical sample remains an essential step before approving the commercial quantity.
Rigid Box Design: From Idea to Print-Ready File
Rigid box design starts from the product itself, not from the outer shape of the box. Before setting colors, the logo and finishing, the product’s dimensions, weight, how it sits inside the box, the space needed for the insert, and how the box will open and close all need to be locked in.
Step One: Determining the Exact Dimensions
A rigid box is made to the product’s exact measurements, not off the shelf standard sizes. You need the following.
Precise length, width and height. The product’s weight and the number of pieces inside the box. The orientation of the product when the box opens. Any parts prone to breaking or scratching. The space needed to remove the product easily. Whether there is a booklet, card, or internal accessories.
Step Two: The Engineering Dieline
The dieline is the engineering drawing that determines the box parts’ measurements, the cutting, folding and gluing points, and the boundaries for the design and finishing. It differs from one box to another depending on the opening method, board thickness, and covering and insert type.
For this reason, it is not advisable to build the design on a ready made template before the actual structure and dimensions are approved, since any change in thickness or insert can change the entire template’s dimensions.
At Dar ElSewedy, you send us your product’s dimensions and our team creates the custom dieline. You do not need any prior technical expertise.
Step Three: Graphic Design
Once the dieline is approved, the design is laid out across the outer and inner surfaces, taking the following into account.
- CMYK, not RGB: screens display RGB, while printing works in CMYK, so colors will differ if the file is not converted.
- 300 DPI as a minimum for images and visual elements, less means blurry printing.
- Bleed of 3 to 5 millimeters outside the borders, to avoid white edges after cutting.
Pantone colors for the logo, to guarantee color matching in every batch and a consistent visual identity across all production.
Step Four: The Physical Mockup
Always, before producing the full quantity.
A soft mockup is a ready made paper model assembled by hand without printing, used to evaluate dimensions and assembly.
A hard proof, or printed mockup, is an actual printed sample using the same materials and finishing. This is the most important step, what you see is what you get.
A rule we never compromise on at Dar ElSewedy: your full approval of the hard proof is the only green light to start production.
What Common Mistakes Weaken Rigid Box Quality?
A rigid box design may look perfect on screen, and problems can appear after assembly or once the product is placed inside it. Often, the cause is not weak printing, but an imprecise decision made at the sizing, structure, insert, or sample approval stage.
Choosing a box from a photo alone
Photos can be used as inspiration, but they do not show board thickness, the opening mechanism, hinge quality, or internal space. The photo should be turned into technical specifications that fit the product, instead of trying to copy its look without understanding its structure.
Relying on the product’s listed dimensions without testing it physically
The actual product may differ from the written measurements by a few millimeters, and it may need extra space to hold and remove it. For this reason, providing a sample of the real product is preferred when designing the structure and the insert.
Choosing a higher thickness assuming it is always better
Increasing the board thickness without proper study can make the box heavier, affect how well the lid and base fit, and raise material and shipping costs. What is needed is the thickness that gives the right rigidity for the product’s size and weight.
Designing the insert after finishing the box
The insert is part of the engineering design, not a final decorative addition. Ignoring it early can leave the product unstable, raise its level inside the box, or prevent the lid from closing properly.
Overdoing the finishing
Combining foil, spot UV, embossing and soft touch does not guarantee a more luxurious result. Too many effects can scatter the identity and raise the cost, especially if the design already has many colors and details.
Approving colors from the screen
Screen lighting and its color system differ from the printed result on paper. Colors are also affected by the material, the cellophane, and the finishing, so a color reference or a printed sample should be used whenever color precision matters.
Ignoring the opening and closing experience
The lid might be too tight, the drawer hard to move, or the magnet unbalanced, even though the outer shape looks good. The box should be opened and closed several times and tested for ease of use before approving production.
Neglecting storage and shipping
A traditional rigid box takes up a lot of space because it does not store flat. Ignoring the outer carton dimensions and the stacking and protection method can raise shipping cost or expose corners and materials to scratches.
Running the full quantity without an approved sample
Approving a PDF design or a 3D model is not enough for new projects. A physical sample is what reveals the size, color, texture, edge quality, and how well the product is held in place, before committing to the cost of the commercial quantity.
| Mistake | Likely Result | How to Avoid It |
| Copying a photo without specifications | A box that does not fit the product | Prepare a custom structure |
| Inaccurate measurements | Product movement or difficulty removing it | Test the actual product |
| Excessive thickness | Higher weight and cost | Choose based on size and weight |
| A late insert | Unstable product | Design it with the structure |
| Too much finishing | Visual clutter and extra cost | Choose a finish that serves one main element |
| Approving color from a screen | A different printed color | Approve a sample or color reference |
| Ignoring shipping | Damaged corners and higher cost | Test packing and stacking |
| No sample produced | Discovering errors after production | Approve a physical model first |
At Dar Medhat ElSewedy, preventing these problems starts before the machine runs, through reviewing the product, dimensions, dieline, materials and finishing, then turning the agreed specifications into a sample that can be evaluated and approved before commercial production.
How Much Does Rigid Box Printing Cost?
There is no fixed price for rigid box printing, because every box is designed according to the product’s specifications, quantity, material, opening method, finishing and internal insert. For this reason, a project cannot be priced accurately from a reference photo alone. The technical specifications that affect material consumption, setup time and assembly need to be determined first.
What Factors Determine a Rigid Box’s Price?
- Required quantity
Every project needs initial setup before production, and its cost is spread across the number of units. For this reason, unit cost usually decreases as quantity increases, while it rises for samples and limited quantities.
- Box dimensions
The larger the box’s length, width or height, the more board, covering paper and insert material it consumes. Dimensions can also affect how many units fit on a printing sheet or inside a shipping carton.
- Box shape and opening method
A lid and base box does not cost the same as a magnetic box, a drawer box, or a foldable design. The more parts and cutting, gluing and assembly stages involved, the higher the execution cost.
- Board type and thickness
The rigid board’s thickness and density affect rigidity, weight and material consumption. Choosing a higher thickness than needed does not necessarily mean better quality, and it can raise production and shipping costs.
- Outer covering material
Cost varies between coated paper, kraft, special papers, fabric, and synthetic leather. The material’s compatibility with printing, gluing and finishing also affects the required production stages.
- Printing method and colors
Cost is affected by the choice between digital and offset printing, the number of colors, the use of special colors, the size of the printed area, and the number of different designs within the quantity.
- Finishing
Each finish adds a separate production stage, such as cellophane, soft touch, foil, spot UV, and embossing or debossing. For this reason, finishes should be chosen because they serve the design, not combined without a clear purpose.
- Internal insert
Insert cost varies based on its material, thickness, number of cutouts, cutting precision, and how complex the product’s shape is. Heavy or fragile products may need a different internal solution from light products.
- Assembly, packing and shipping
A traditional rigid box ships in its final form and takes up more space than folding cartons. For this reason, assembly, protective packaging and shipment size should be factored into the project’s total cost, especially for export.
| Cost Factor | Why It Affects Price |
| Quantity | Spreading setup costs across the number of units |
| Size | More material consumption and storage space |
| Box type | Different number of parts and assembly stages |
| Board and covering | Different thickness, material and processing method |
| Printing | Technique, colors and number of designs |
| Finishing | Adding stages, dies and setup tools |
| Insert | Material, cutting precision and shape complexity |
| Shipping | Box size, packing method and delivery destination |
How Do You Lower Cost Without Weakening the Box’s Quality?
Cost can be reduced by choosing a suitable thickness instead of the highest one, reducing the number of finishes, unifying the box size across several similar products, or using one core design with a different cover or insert between editions. Choosing the printing technique suited to the quantity also helps avoid unnecessary cost.
ElSewedy Insight: Do not start by asking how much the box costs. Ask instead what specifications your product actually needs. Once the required function is defined, it becomes easy to remove any element that raises cost without adding protection or brand value.
For an accurate price quote, send the size, quantity, product type, box opening method, material and required finishing, the internal insert, and the design file if available, along with the delivery city or country.
What Do You Need to Send to Start a Rigid Box Printing Project?
To get a technical assessment and an accurate price quote, you do not need to have every detail or a ready production file. But the clearer the product, quantity and use information, the more accurate the choice of structure, material, finishing and cost becomes.
Send the following information.
Product details
The product type and its use. Length, width and height. Approximate weight. The number of pieces and accessories inside the box. Clear photos or a physical sample if possible. Any parts prone to breaking or scratching.
Required box specifications
The box type if already decided, lid and base, magnetic, drawer, or other. Reference photos for the shape or the desired opening experience. The insert type if known. The required material or texture. Suggested finishing such as foil, spot UV, or embossing.
Production details
The required quantity. The number of designs or different products. Is this a first trial or repeat production? The product launch date or required delivery date. The delivery city and country. An approximate budget if set.
Identity and design files
If the design is ready, send the logo, brand identity files, color codes, and either the open design file or a high quality PDF. If you do not have a dieline yet, do not finalize the design layout before the box structure and dimensions are approved.
You can use the following short template when sending your request.
- Product type:
- Product dimensions and weight:
- Number of pieces inside the box:
- Required box type:
- Quantity:
- Material and finishing:
- Internal insert:
- Number of designs:
- Delivery date:
- Delivery city and country:
- Is there a ready design?
Once this information is received, the Dar Medhat ElSewedy team can review the project, identify any missing details, and suggest the appropriate execution method before moving to the sample and production stages.
Order and Delivery Steps for Saudi Arabia and the Gulf
Step one: initial contact, day one. Send us the product dimensions, required quantity, rigid box type, required finishing, and the design file if ready.
Step two: price quote and dieline, within 24 to 48 hours. We send a detailed price quote and a custom dieline for your dimensions.
Step three: the physical mockup, 5 to 8 days. We produce a real hard proof and ship it to you by express mail to Riyadh, Jeddah, Dubai or Kuwait for final approval.
Step four: full production, 15 to 25 days. Once you approve, the machines start. Comprehensive quality monitoring runs at every stage.
Step five: finishing and packing for shipping. Every finish is executed precisely, followed by protective packing suited to the product’s nature.
Step six: shipping and customs clearance. By sea or air depending on your schedule, we handle all export documents and customs clearance.
Step seven: delivery to your door. The shipment arrives at your warehouse in Riyadh, Jeddah, Dammam, Dubai, Abu Dhabi or Kuwait.
Frequently Asked Questions
What is the difference between a rigid box and a regular cardboard box?
A rigid box is made from greyboard, 1 to 3 millimeters thick, that does not fold, and it is heavy and solid, giving an impression of luxury. A regular folding carton is thin and foldable, more economical but less premium. The choice depends on your product’s value and your target segment.
What is the minimum quantity for ordering rigid boxes?
The minimum quantity varies depending on the box type, size, material, printing method and finishing. Digital printing can be used for limited quantities or design testing, while offset usually becomes more efficient when moving to commercial quantities.
How do I make sure of the quality before full production?
We produce a physical hard proof using the same materials and finishing and ship it to you by express mail. Your approval of it is required before production begins.
Can internal dividers be added to a rigid box?
Yes, laser cut foam shaped exactly to the product, paper dividers, or satin padding, all designed based on the product’s shape and specified in the design file.
What is the difference between lid and base and magnetic closure?
Lid and base opens in a classic way, with the lid lifted off the base. Magnetic closure opens sideways like a book with a satisfying magnetic click, a more luxurious experience that costs 30 to 50 percent more.
Does Dar Medhat ElSewedy ship rigid boxes to Saudi Arabia and the Gulf?
Yes, Dar Medhat ElSewedy prepares weekly shipments to Riyadh, Jeddah, Dammam, Dubai, Abu Dhabi and Kuwait. The packing and shipping method is determined based on the quantity, box type, delivery destination, and the specific project agreement.
Conclusion
Before a customer sees your product’s details or tries it, they have already formed their first impression from the box. The box’s rigidity, how well it holds the product, the material’s texture, the smoothness of opening, and print precision, all of these details tell the customer whether the brand genuinely cares about what it offers.
For this reason, rigid box printing for luxury products should not start with picking an attractive finish alone, but with building a complete set of specifications that fit the product, protect it, and show its value without adding cost that does not serve the goal.
At Dar Medhat ElSewedy Printing, we help you turn your idea into a producible box. We review the product’s dimensions and weight, determine the right structure, materials and insert, check the dieline and print file, then produce a test sample for approval before running the commercial quantity.
Do you have a product that deserves stronger packaging? Do not just send us a photo of a box you liked. Send us the following.
The product type and photos. Its dimensions and weight. The required quantity. The box shape or opening experience you prefer. The suggested finishing and insert, if any. The delivery city and country. The design file or visual identity if it is ready.
Send your project details today to the Dar Medhat ElSewedy team, and get a technical review and a price quote based on your product’s actual specifications.
Email: info@elsewedyprint.com